The container orchestrator Kubernetes is a very powerful tool in the modern cloud-based world. Allowing for high scalability, reliability and availability, it is broadly used and available on all cloud providers. It is often described as a cloud-native technology, and it certainly qualifies as one. However, the cloud-native concept does not exclude the use of on-premises infrastructure in cases where it makes sense. Sometimes, there are advantages to running Kubernetes deployments on-premises. The best Kubernetes architecture for your organization depends on your needs and goals. Here is how you can set up a single-master, multi-node Kubernetes v1.21.x cluster on your own CentOS 7 bare metal (or virtual) machines, using kubeadm.

STEP 1 → INSTALLING KUBEADM
Prerequisites
- A compatible Linux host. The Kubernetes project provides generic instructions for Linux distributions based on Debian and Red Hat, and those distributions without a package manager.
- 2 GB or more of RAM per machine
- 2 CPUs or more
- Full network connectivity between all machines in the cluster (public or private network is fine)
- Unique hostname, MAC address, and product_uuid for every node.
- Certain ports are open on your machines.
- Swap disabled. You MUST disable swap in order for the kubelet to work properly.
sudo swapoff -a
sudo vi /etc/fstab
  -> then comment out the swap line UUID
OR use the following command without editing the file
sudo sed -i '/ swap / s/^/#/' /etc/fstab
NOTES:
- All the steps given here are for CentOS machines only. For other operating systems, the steps will be slightly different.
- Make sure you run all the checks and commands covered in “STEP 1” on all cluster nodes.
Verify the MAC address and PRODUCT_UUID are unique for every node
- You can get the MAC address of the network interfaces using the command ip link or ifconfig
- The product_uuid can be checked by using the command sudo cat /sys/class/dmi/id/product_uuid
It is very likely that hardware devices will have unique addresses, although some virtual machines may have identical values.
Kubernetes uses these values to uniquely identify the nodes in the cluster. If these values are not unique to each node, the installation process may fail.
Letting IP tables see bridged traffic
Make sure that the br_netfilter module is loaded. This can be done by running lsmod | grep br_netfilter. To load it explicitly, call sudo modprobe br_netfilter.
As a requirement for your node’s iptables to correctly see bridged traffic, you should ensure net.bridge.bridge-nf-call-iptables is set to 1 in your sysctl config, e.g.
cat <<EOF | sudo tee /etc/modules-load.d/k8s.conf
br_netfilter
EOF

cat <<EOF | sudo tee /etc/sysctl.d/k8s.conf
net.bridge.bridge-nf-call-ip6tables = 1
net.bridge.bridge-nf-call-iptables = 1
EOF
Now restart sysctl to apply the changes:
sudo sysctl --system
Changes should be reflected here:
sudo cat /proc/sys/net/bridge/bridge-nf-call-iptables
sudo cat /proc/sys/net/bridge/bridge-nf-call-ip6tables
Check required ports
Control-plane node(s)

Worker node(s)
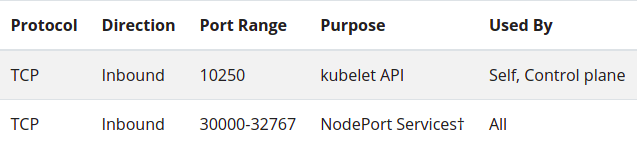
Any port numbers marked with * are overridable, so you will need to ensure any custom ports you provide are also open.
Installing runtime
By default, Kubernetes uses the Container Runtime Interface (CRI) to interface with our chosen container runtime.
If we don’t specify a runtime, kubeadm automatically tries to detect an installed container runtime by scanning through a list of well known Unix domain sockets. The following table lists container runtimes and their associated socket paths:
| Runtime | Path to Unix domain socket |
| Docker | /var/run/dockershim.sock |
| containerd | /run/containerd/containerd.sock |
| CRI-O | /var/run/crio/crio.sock |
If both Docker and containerd are detected, Docker takes precedence. This is needed because Docker 18.09 ships with containerd and both are detectable even if you only installed Docker. If any other two or more runtimes are detected, kubeadm exits with an error.
Kubernetes announced that it is deprecating Docker as a container runtime after v1.20, that’s why we will show here how you can install and use containerd instead.
Install and configure prerequisites:
cat <<EOF | sudo tee /etc/modules-load.d/containerd.conf
overlay
br_netfilter
EOF

sudo modprobe overlay
sudo modprobe br_netfilter (skip this command if you loaded it in the previous steps)

# Setup required sysctl params, these persist across reboots.
# Note that this step was already executed, we’re additionally enabling here IP forwarding
cat <<EOF | sudo tee /etc/sysctl.d/k8s.conf
net.bridge.bridge-nf-call-iptables  = 1
net.ipv4.ip_forward                 = 1
net.bridge.bridge-nf-call-ip6tables = 1
EOF

# Apply sysctl params without reboot
sudo sysctl --system
Install the containerd.io package from the official Docker repository:
# Install required packages
sudo yum -y install yum-utils device-mapper-persistent-data lvm2

# Add the Docker repository
sudo yum-config-manager --add-repo https://download.docker.com/linux/centos/docker-ce.repo

# Update currently installed packages
sudo yum -y update

# Install containerd
sudo yum -y install containerd.io

# Start containerd automatically at boot
sudo systemctl enable containerd
NOTE: We’re installing the containerd.io package from the official Docker repositories. These instructions can only be used on CentOS for setting up the Docker repository and installing containerd.io. If you decide to go with a different Linux distribution, then please check the required installation steps at Install Docker Engine.
# Configure containerd
sudo mkdir -p /etc/containerd
containerd config default | sudo tee /etc/containerd/config.toml

# Restart containerd
sudo systemctl restart containerd
To use the systemd cgroup driver in /etc/containerd/config.toml with runc, set:
[plugins."io.containerd.grpc.v1.cri".containerd.runtimes.runc]
  ...
  [plugins."io.containerd.grpc.v1.cri".containerd.runtimes.runc.options]
    SystemdCgroup = true

# If you apply this change make sure to restart containerd again
sudo systemctl restart containerd
Installing Kubeadm, Kubelet and Kubectl
You will install these packages on all of your machines:
- kubeadm: the command to bootstrap the cluster.
- kubelet: the component that runs on all of the machines in your cluster and does things like starting pods and containers.
- kubectl: the command line util to talk to your cluster.
kubeadm will not install or manage kubelet or kubectl for us, so we will need to ensure they match the version of the Kubernetes control plane we want kubeadm to install for us. If we do not, there is a risk of a version skew occurring that can lead to unexpected, buggy behaviour. However, one minor version skew between the kubelet and the control plane is supported, but the kubelet version may never exceed the API server version. For example, the kubelet running 1.7.0 should be fully compatible with a 1.8.0 API server, but not vice versa.
WARNING: These instructions exclude all Kubernetes packages from any system upgrades. This is because kubeadm and Kubernetes require special attention to upgrade.
# Add the kubernetes repository to the CentOS system:
cat <<EOF | sudo tee /etc/yum.repos.d/kubernetes.repo
[kubernetes]
name=Kubernetes
baseurl=https://packages.cloud.google.com/yum/repos/kubernetes-el7-\$basearch
enabled=1
gpgcheck=1
repo_gpgcheck=1
gpgkey=https://packages.cloud.google.com/yum/doc/yum-key.gpg https://packages.cloud.google.com/yum/doc/rpm-package-key.gpg
exclude=kubelet kubeadm kubectl
EOF

# Set SELinux in permissive mode (effectively disabling it)
sudo setenforce 0
sudo sed -i 's/^SELINUX=enforcing$/SELINUX=permissive/' /etc/selinux/config

# Install the kubernetes packages kubelet, kubeadm and kubectl (v1.21.2)
sudo yum install -y kubelet-1.21.2 kubeadm-1.21.2 kubectl-1.21.2 --disableexcludes=kubernetes

# Start kubelet process
sudo systemctl enable --now kubelet
NOTES:
- Setting SELinux in permissive mode by running setenforce 0 and sed … effectively disables it. This is required to allow containers to access the host filesystem, which for example is needed by pod networks.
- Here it’s explicitly given in the command that version 1.21.2 of kubeadm, kubectl and kubelet should be installed on the nodes. If you don’t specify any particular version, then the latest one will be installed by default.
- After starting the kubelet process, it is going to restart every few seconds, as it waits in a crashloop for kubeadm to tell it what to do. This crashloop is expected and normal. After you initialize your control-plane, the kubelet runs normally.
Configuring a cgroup driver
Both the container runtime and the kubelet have a property called “cgroup driver”, which is important for the management of cgroups on Linux machines.
WARNING: Matching the container runtime and kubelet cgroup drivers is required as the kubelet process will otherwise fail.
How can you configure it?
Well, kubeadm allows you to pass a KubeletConfiguration structure during kubeadm init. This KubeletConfiguration can include the cgroupDriver field which controls the cgroup driver of the kubelet.
NOTE: If you don’t set the cgroupDriver field under KubeletConfiguration, kubeadm init will default it to systemd. Although we want to use systemd in our case and there is no need to explicitly define it, we show below how you can add it.
This is just a minimal example of how you can configure the cgroupDriver field. Note that the real config we’re going to pass to kubeadm init command is shown as part of the Step 2 of this documentation:
# kubeadm-config.yaml
kind: ClusterConfiguration
apiVersion: kubeadm.k8s.io/v1beta2
kubernetesVersion: v1.21.0
---
kind: KubeletConfiguration
apiVersion: kubelet.config.k8s.io/v1beta1
cgroupDriver: systemd

# This config file will be passed to the kubeadm command used for the initialization of the cluster
kubeadm init --config kubeadm-config.yaml
NOTE: Kubeadm uses the same KubeletConfiguration for all nodes in the cluster. The KubeletConfiguration is stored in a ConfigMap object under the kube-system namespace.
Executing the sub commands init, join and upgrade would result in kubeadm writing the KubeletConfiguration as a file under /var/lib/kubelet/config.yaml and passing it to the local node kubelet.
STEP 2 → KUBERNETES CLUSTER INITIALIZATION
NOTE: Make sure you run the following command on the control plane node only!
The control-plane node is the machine where the control plane components run, including etcd (the cluster database) and the API Server (which the kubectl command line tool communicates with).
- (Recommended) If you have plans to upgrade this single control-plane kubeadm cluster to high availability, you should specify the –control-plane-endpoint to set the shared endpoint for all control-plane nodes. Such an endpoint can be either a DNS name or an IP address of a load-balancer.
- Choose a Pod network add-on, and verify whether it requires any arguments to be passed to kubeadm init. Depending on which third-party provider you choose, you might need to set the –pod-network-cidr to a provider-specific value. See Installing a Pod network add-on.
- (Optional) Since version 1.14, kubeadm tries to detect the container runtime on Linux by using a list of well known domain socket paths. To use a different container runtime or if there are more than one installed on the provisioned node, specify the –cri-socket argument to kubeadm init. See Installing runtime.
- (Optional) Unless otherwise specified, kubeadm uses the network interface associated with the default gateway to set the advertise address for this particular control-plane node’s API server. To use a different network interface, specify the –apiserver-advertise-address=<ip-address> argument to kubeadm init. To deploy an IPv6 Kubernetes cluster using IPv6 addressing, you must specify an IPv6 address, for example –apiserver-advertise-address=fd00::101
- (Optional) Run kubeadm config images pull prior to kubeadm init to verify connectivity to the gcr.io container image registry.
Configuring the Kubelet cgroup driver
Create kubeadm-config.yaml file with the proper kubernetesVersion, controlPlaneEndpoint and podSubnet:
# kubeadm-config.yaml
kind: ClusterConfiguration
apiVersion: kubeadm.k8s.io/v1beta2
kubernetesVersion: v1.21.2
controlPlaneEndpoint: “k8sapi.master.net”
networking:
  podSubnet: “10.244.0.0/16”
---
kind: KubeletConfiguration
apiVersion: kubelet.config.k8s.io/v1beta1
cgroupDriver: systemd

# Initialize the cluster
sudo kubeadm init --config kubeadm-config.yaml

# NOTE: Use this command instead the prior one if there is more than one socket available on the control plane node
sudo kubeadm init --config kubeadm-config.yaml --cri-socket=/run/containerd/containerd.sock
NOTES:
- If you don’t plan to upgrade the cluster to a highly-available one, you can put your control plane node’s IP address as controlPlaneEndpoint value. If you’re not sure about this, the best way will be to update your /etc/hosts file and add your control plane node’s IP address and custom DNS name that map to this IP in the given format: ex. 172.22.31.21 k8sapi.master.net. This will allow you to pass –control-plane-endpoint=k8sapi.master.net directly to kubeadm init (or as part of ClusterConfiguration in the kubead-config.yaml file as given above) and then pass the same DNS name to kubeadm join. Later, you can modify this DNS name to point to the address of your load-balancer in a high availability scenario.
- Turning a single control plane cluster created without –control-plane-endpoint into a highly available cluster is NOT supported by kubeadm.
- Defining cgroupDriver: systemd is not mandatory in our case since it’s the default value, but it’s given here just as an explanation of how this field can be used.
Kubeadm command will output a command that will be used to join workers (nodes) to this master (control plane). Make a note of this command as it contains secrets needed for connection. We will use this command below when we use `kubeadm join` for the workers.
`kubeadm init` also outputs these 3 commands that are used to configure kubectl access to the newly created cluster. Make sure you execute them on the control plane node so you can access the cluster via kubectl:
mkdir -p $HOME/.kube
sudo cp -i /etc/kubernetes/admin.conf $HOME/.kube/config
sudo chown $(id -u):$(id -g) $HOME/.kube/config
NOTE: These three commands should be repeated for each user who needs to have kubectl permissions.
You must deploy a Container Network Interface (CNI) based Pod network add-on so that your Pods can communicate with each other. Cluster DNS (CoreDNS) will not start up before a network is installed.
You can install a Pod network add-on (Flannel in our case) with the following command on the control-plane node:
kubectl apply -f https://raw.githubusercontent.com/coreos/flannel/master/Documentation/kube-flannel.yml
You can install only one Pod network per cluster.
Once a Pod network has been installed, you can confirm that it is working by checking that the CoreDNS Pod is Running in the output of kubectl get pods –all-namespaces. And once the CoreDNS Pod is up and running, you can continue by joining your nodes.
STEP 3 → JOINING YOUR NODES
NOTE: Make sure you run the following commands on (worker) nodes only!
The nodes are where your workloads (containers and Pods, etc) run. To add new nodes, execute the command after enabling containerd and kubelet services:
# This command will be outputted after cluster’s initialization on the control plane. Copy and paste it to each node that should join the cluster and don’t forget to use --cri-socket if there is more than one socket available on the nodes


sudo kubeadm join --token <token> <control-plane-host>:<control-plane-port> --discovery-token-ca-cert-hash sha256:<hash> --cri-socket=/run/containerd/containerd.sock
If you do not have the token, you can get it by running the following command on the control-plane node:
sudo kubeadm token list
By default, tokens expire after 24 hours. If you are joining a node to the cluster after the current token has expired, you can create a new token by running the following command on the control-plane node:
sudo kubeadm token create --print-join-command
NOTE: If we want to add additional nodes to the cluster, we need to repeat the procedure explained above. Actually, we need to run the commands given in STEP 1 and STEP 3 of this document.
STEP 4 → TEST YOUR CLUSTER
To check whether you can successfully create k8s workloads, login to the control plane node and create new deployment named nginx using the kubectl command:
kubectl create deployment nginx --image=nginx
Expose the nginx pod to be accessible via the internet. Create a new service nodeport for this purpose:
kubectl create service nodeport nginx --tcp=80:80
Check the status of the nginx pod and service using the kubectl commands given below:
kubectl get pod
kubectl get svc
OR
kubectl -n default get all
If everything looks good, you can continue and check it on the browser by visiting the IP address of the cluster’s control plane OR one of the nodes on port 80.
Conclusion
This procedure for creating Kubernetes clusters follows the official documentation and it’s applicable for clusters other than production. If you need to create an on-prem Kubernetes production cluster, high availability is highly recommended in that case. In the NOTES of the Steps above you’ll be able to find how you can start with only one control plane and multiple nodes and then move to high-availability when that’s needed.
Creating an on-prem cluster is definitely NOT the easiest choice when creating a Kubernetes cluster, but it is getting considerably easier over time as Kubernetes is improving a lot in terms of how you need to deploy and manage it.
In one of the following posts you’ll be able to find how to create a highly-available cluster, and also one that’s behind a corporate proxy. Stay tuned!